Thursday, April 12, 2018

Instapot Honey Parmesan Pork Tenderloin

Makes 6-8 Servings

I would have to say this is definitely one of my 5 best recipes. The meat comes out perfectly cooked and so tender, the veggies can cook in the same pot right along with it, and the sauce is the perfect combination of tangy and cheesy with just a hint of sweet. It's simple to throw together but it tastes gourmet.

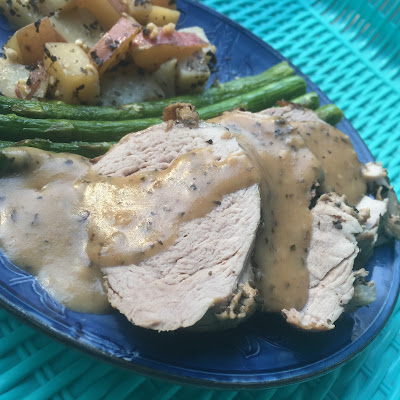
My favorite thing about the Instapot is that usually you just dump stuff in and push the button. This recipe has a few more steps than normal and, generally, I'm super opposed to that. However, in this case it is 100% worth it. Matt is hands down the laziest cook in the world but this meal is so delicious that even HE chooses to make it on nights that he cooks. In fact, the dinner pictured below was made by him :) I married a brilliant man... in all things besides cooking. But that is a testament to just how easy this is.

The kids basically throw a party when they hear this is on the menu and everyone licks their plates clean....not figuratively, literally. We serve it with a side of grilled asparagus. Originally I figured this was 8 servings but then Matt ate almost an entire pork tenderloin by himself....sooooooo I changed it to 6-8. Enjoy!

Drooooooool. Also, I finally managed to take a good food pic.
This was the direct result of my friend, Christine, helping me and
a perfectly timed sunset for lighting :)  


Ingredients:
  • 2 lb pork tenderloin
  • 2 Tbsp honey
  • 2/3 cup broth (I've been using veggie lately bc I found this awesome powdered veggie broth)
  • 3 Tbsp soy sauce
  • 2 Tbsp dried basil
  • 2 Tbsp minced garlic
  • 2 cups cubed potatoes (optional)
  • 2 cups baby carrots (optional)
After pressure cooking-
  • 2 Tbsp whole wheat flour
  • 1/2 cup Parmesan cheese
Instructions:
1. Plug in Instapot and push the Saute button. When it says HOT, add a splash of olive oil and place the tenderloin in the pot. Let it brown a bit, about 2 mins per side.

2. Mix together the 2 Tbsp honey, 2/3 cup broth, 3 Tbsp soy sauce, 2 Tbsp dried basil, and 2 Tbsp minced garlic. Once the tenderloin is browned, take it out and place it on a plate briefly. Pour the sauce mixture into the pot and scrape the bottom to deglaze it. 

3. Push Keep Warm/Cancel to turn off Saute. Add the tenderloin back to the pot and roll it around in the sauce mixture to cover it.

4. If you are using potatoes and carrots, place the trivet over the meat and then put the veggies in a steamer basket on top. Make sure the steamer basket is low enough that it doesn't interfere with the lid, though.

5. Make sure that the sealing ring is firmly in the lid of the pot, put the lid on and seal it, turn the knob on the top towards the back to "sealing", and push the Manual button and use the + and - buttons to adjust the time until it says 5 minutes.

6. At first the pot will just say "On" but, once it has come to pressure, it will start counting back the time. Once it is done cooking, it will beep and you will see an L and the time counting back up on the display. WAIT 6 MINUTES and then do a Quick Release. (for the newbies, VERY carefully WITHOUT your face or body over the top of the pot, turn the little knob on top counter-clockwise towards the front and a rush of steam will come out the top. Once the pressure is released, the little silver knob to the right of the black knob will go down and you will be able to take the lid off.)

7. Push the Keep Warm/Cancel button to turn it off and remove the veggies (if using) and tenderloin and set aside. Stir the 2 Tbsp whole wheat flour and 1/2 cup Parmesan cheese into the sauce remaining in the pot. Push the saute button and let the sauce bubble and thicken a bit, stirring frequently especially towards the end.

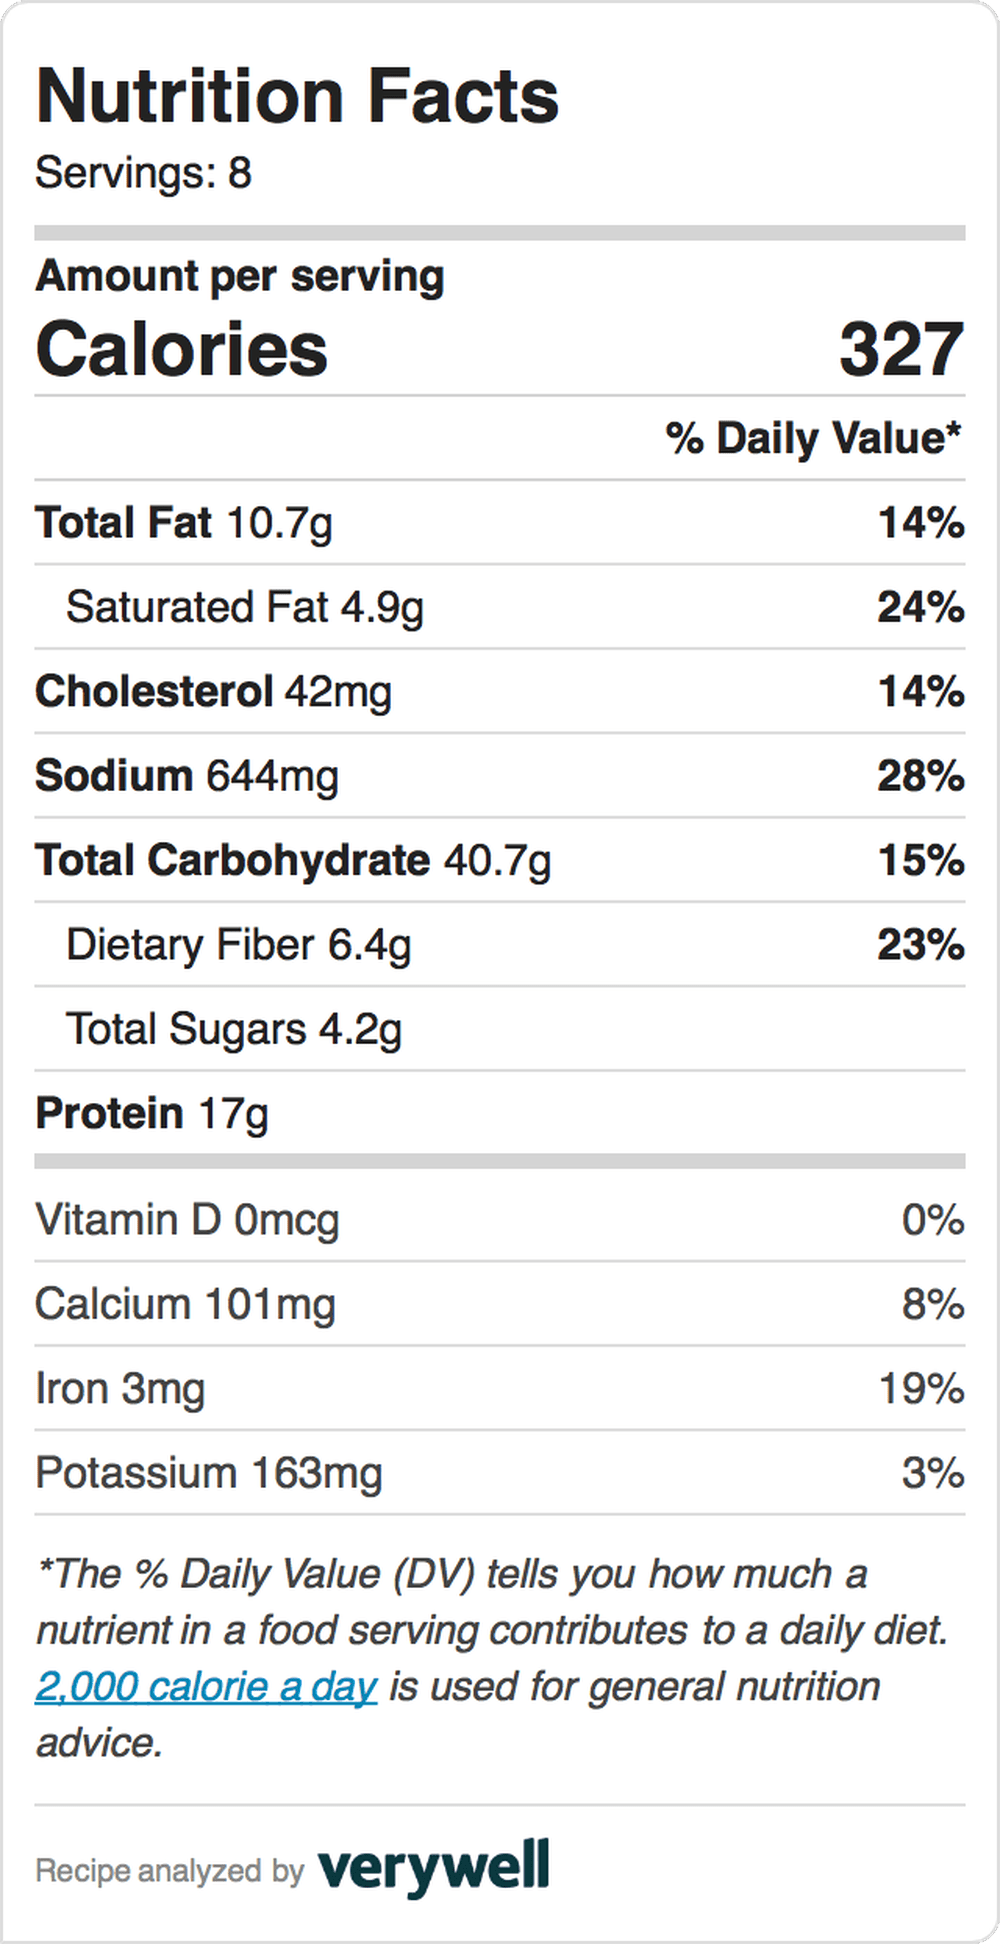
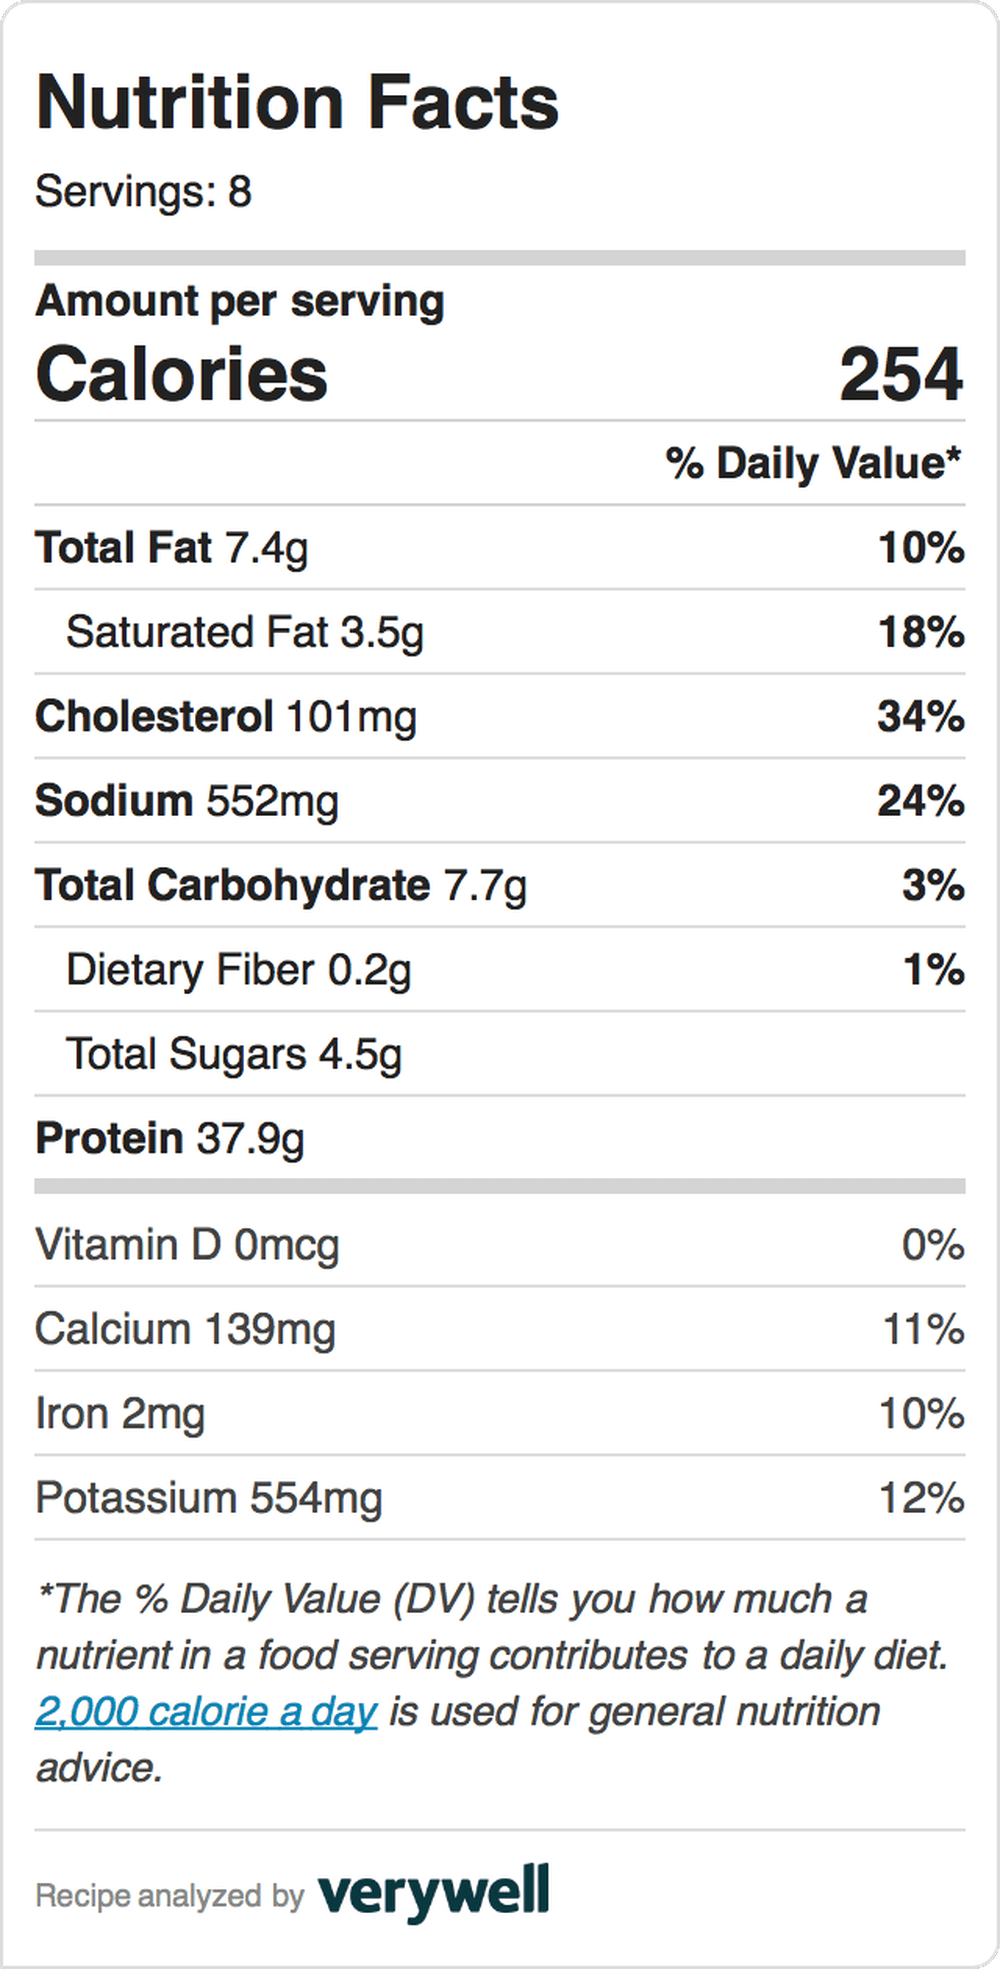
Nutrition Info- For pork tenderloin and sauce only
Thursday, April 5, 2018

Instant Pot Baked Ziti

Makes 8 1-cup servings

This is a tried and true recipe that I have since adapted to the Instapot. I have two phases in my cooking-life; BIP and AIP....Before Instapot and After Instapot lol. But, seriously, WHAT did we used to eat before I had an Instapot???

I am not the best photographer and, granted, this is basically
 just pasta. But it's delicious and I dumped stuff in a pot
 and walked away so it's almost like I didn't have to cook. 

Ingredients:
  • 10 oz package sausage (I like Dietz&Watson brand bc they are precooked and nitrate and nitrite free but whatever floats your boat. We have used every kind from Chicken Apple to Italian Style.)
  • 3 cups water
  • 1/2 tsp salt
  • 1 Tbsp dried basil
  • 28oz can crushed tomatoes
  • 12oz package whole wheat pasta (it's called "Baked Ziti" but I can confidently say I have NEVER actually used Ziti. We always do Rotini.)
  • 4 big handfuls of spinach (Buy bags of fresh spinach and shove them in the freezer. When they are frozen they crumble like a dream and you can add them to anything. Plus it doesn't freeze in one big block so you can just sprinkle it or scoop it out.)
After Cooking-
  • 2 Tbsp Parmesan cheese
  • 1 cup shredded mozzarella
  • 4 oz cream cheese (1/2 a brick)
Instructions:
1. Put the Instapot on sauté, throw the sausage in, and let it brown a little, stirring occasionally. (Obviously if your sausages are not precooked, wait until they are almost cooked through for this step.)

2. Once the sausage is a bit brown, push the Keep Warm/Cancel button to turn off sauté and dump the pasta and the 3 cups water into the pot. Add the 1/2 tsp salt and 1 Tbsp basil and stir.

3. Dump the 28oz can of tomatoes on top. The pasta should be almost completely submerged so add a little extra water if needed. Throw the 4 handfuls of spinach on top. (Try not to stir bc the Instapot doesn't really like tomato stuff touching the bottom. Sometimes it scorches and then the pot won't come to pressure nicely.)

3. Make sure that the sealing ring is firmly in the lid of the pot, put the lid on and seal it, turn the knob on the top towards the back to "sealing", and push the Manual button. Pasta cooks in the Instapot for half the time it is supposed to cook on the stove. My brand of pasta calls for 10 minutes cook time for al dente so I set my Manual time for 5 minutes (push Manual and use the + and - buttons to adjust the time). 

4. At first the pot will just say "On" but, once it has come to pressure, it will start counting back the time (in my case it will be counting backwards from 5 to 1.) Once it is done cooking, it will beep and you will see an L and the time counting back up on the display. Do a Quick Release. (for the newbies, VERY carefully WITHOUT your face or body over the top of the pot, turn the little knob on top counter-clockwise towards the front and a rush of steam will come out the top. Once the pressure is released, the little silver knob to the right of the black knob will go down and you will be able to take the lid off.)

5. Remove the lid and stir in the 2 Tbsp Parmesan, 1 cup mozzarella, and 4oz of cream cheese. Serve and enjoy :)

Even though this is called Baked Ziti, I guess technically it is no longer "baked". If you wanted to bake it, you could stir in the parmesan and cream cheese and then dump it into a 9x13 baking dish, sprinkle the mozzarella on top, and bake it at 475 for 10 or 15 mins until the cheese is golden brown and crispy.

Thursday, December 29, 2016

Clean Eating Pumpkin Potage (or Pumpkin Soup) Instant Pot

Makes 12 servings, about 1 cup each
Another seriously delicious soup that is basically a vat of pureed veggies. The Broccoli Cheese Soup was such a success in our house that I wanted to see what other great veggie soups the Instant Pot could create. This one was greeted with equal enthusiasm by all the kids. Here in Japan they make this AMAZING pumpkin soup and this was our attempt at recreating it.

Also, again, if you have not tried the Instant Pot yet you are seriously missing out. We use ours so much that we actually got a second one in an Amazon flash sale.


Ingredients:
  • 6 cups chopped broccoli (I used frozen)
  • 1/2 cup dry minced onion (or 1 medium onion, chopped)
  • 4 cups vegetable stock (or chicken stock)
  • 4 cups water
  • 2 tsp salt
  • 1 lb potatoes, peeled and chopped
  • 5 cups pureed pumpkin (I use one big 29oz can and one little 15oz can)
  • 1 12oz can evaporated milk
  • 1/2 cup honey
ONE: Dump everything except the can of milk and the honey in the Instant Pot. (I like to turn the sauté function on while I am measuring and dumping to start heating up the broth. That way it will come to pressure faster.) Cook on Manual High Pressure for 6 minutes.

TWO: Quick pressure release (that means when it is done, turn the knob on top to vent so all the steam rushes out), add the can of milk and the honey, and puree until smooth.

Alternate Cooking Instructions: If you don't have an Instant Pot, just dump all of the ingredients except the milk and honey into a large sauce pan. Heat over medium high heat until the veggies are soft. Then add the milk and honey and puree.

Freeze leftovers in 1 cup portions using the medium/large portion method to feed your freezer stash.

NUTRITION INFO:
:)


Monday, September 19, 2016

Broccoli Cheese Soup (Instant Pot)

Makes 6 servings, about 1 cup each
We have been eating a RIDICULOUS amount of this soup. My kids love it even though it is basically a vat of pureed veggies. I love that it is so easy to make...and that my kids are eating a vat of pureed veggies :) 

Have you heard about the Instant Pot?! It is an electronic pressure cooker and it has changed my life. I use it at least once a day and it has replaced many of my other kitchen appliances. How did I not know the glories of pressure cooking before now?!

Picture Coming Soon....

Ingredients:
  • 2 tsp olive oil
  • 1 medium onion, chopped
  • 2 medium carrots, chopped
  • 4 cups vegetable broth (can substitute chicken broth)
  • 6 cups chopped broccoli (I used frozen)
  • 2 cups chopped cauliflower (I used frozen)
  • 1/2 tsp salt
  • 1/2 tsp garlic powder
  • 1 1/3 cups shredded cheddar cheese (we prefer extra sharp)
  • 12oz can evaporated milk (optional but makes it creamier)
ONE: Push the sauté button and sauté the onion in the olive oil until tender, about 8 minutes.

TWO: Dump everything except the shredded cheese and evaporated milk into the inner pot. Make sure the lid has the sealing ring in place, put the lid on, close it, and turn the vent to sealing. Press manual and adjust to hi pressure and 6 minutes. 

THREE: Once the cooking time is complete, quick release the pressure and carefully remove the lid.

FOUR: Dump the shredded cheese and evaporated milk (if using) into the pot and puree with an immersion blender. Try not the eat the entire pot in one sitting.

Freeze leftovers in 1 cup portions using the medium/large portion method to feed your freezer stash.

NUTRITION INFO:
Per 1 cup serving including the evaporated milk- 272 Calories (139 Calories from Fat), 15g Fat, 8g Saturated Fat, 0g Trans Fat, 43mg Cholesterol, 973mg Sodium, 817mg Potassium, 18 Total Carbohydrates, 4g Dietary Fiber, 10.5g Sugar, 17g Protein, 87%DV VitA, 167%DV VitC, 40%DV Calcium, 9%DV Iron
:)

Tuesday, September 8, 2015

Clean Eating Pumpkin Pie Baked Oatmeal Easy Version

Makes 8 servings
We LOVE baked oatmeal in this house. Our favorite is Cookie Dough Baked Oatmeal but Pumpkin Pie Baked Oatmeal is a close second. We have been making it for so long, though, that I have found that half the time I can't be bothered with the finickiness of making the layers in the original. I found that I was keeping the ingredients mostly the same but just dumping it all together. Here's how:


Ingredients:
  • 2 or 3 ripe bananas
  • 3 cups uncooked oatmeal (I used rolled oats)
  • 1 tsp baking powder
  • 1 can pumpkin (make sure it's just pureed pumpkin with nothing random added like sweeteners)
  • 1/2 cup sucanat/honey (can use brown sugar but it won't be "clean")
  • 2 tsp cinnamon
  • 1 tsp nutmeg
  • 1/4 tsp ginger
  • 1/4 tsp salt
  • 2 cups milk (I used unsweetened almond milk)
  • 1 tsp vanilla extract
  • 1 tsp almond extract
  • 1/2 cup chopped nuts (I like pecans)
ONE: Spray a 9x13 baking dish lightly with cooking spray. (This is only bold and red because I personally forget it EVERY. SINGLE. TIME) Thinly slice the bananas and spread them over the bottom of the dish. Place in the oven and preheat to 375. The bananas will soften while the oven heats up.

TWO: Mix everything else together. I usually mix half of the nuts in and sprinkle the other half on top.

THREE: Once the oven is preheated, remove the baking dish. Dump the oatmeal mixture over the top of the bananas and spread it evenly. Bake 25-30 minutes until the top is golden brown. Cut into 8 or 12 servings (we eat a big breakfast so I always cut ours into 8) and serve warm.

Freeze leftovers using the flash freeze method to feed your freezer stash. Reheat in the microwave or oven.

Friday, September 4, 2015

Clean Eating Cookie Dough Baked Oatmeal

Makes 8 servings

We have this for breakfast at LEAST once a week. It is a favorite of all of the kids and I love that it makes enough for leftovers for the next day. I didn't realize just how much we ate it until we took a month long trip back to the States...and I was without my recipe card box. You know me, even though I make it every single week, I can't cook anything without the recipe. This is adapted from this recipe so I was able to look up the original and re-figure out how I make it but I thought maybe it was a sign I needed to hurry up and post it. Makes you wonder what other things I have hidden away in my recipe box, doesn't it?! My sister, Anthea, doesn't find that funny at all. She accuses me of hoarding all the good stuff ;)


Ingredients:
  • 3 cups uncooked oatmeal
  • 1 tsp vanilla
  • 1/3 cup natural sweetener (I use sucanat)
  • 1 1/2 cups applesauce or mashed banana
  • 1 1/2 cups milk of choice
  • 1/2 tsp salt
  • 1/3 cup chocolate chips
  • 1/4 cup peanut butter (or coconut oil/butter/other nut butter)
ONE: Preheat the oven to 380 degrees Fahrenheit. Spray a 9x13 pan or muffin cups with cooking spray.

TWO: Mix everything together and pour into prepared pan. Bake 20-25 minutes or until golden brown and the top springs back.


:)

Saturday, June 6, 2015

Clean Eating Tamale Pie

Makes 8 Servings
I love cornbread, one dish meals, and sneaking vegetables into stuff. This dish is all that and more!! I have actually wanted to make tamale pie for a few years. It always seemed like a really good idea but I never found a recipe that called to me. I think I actually tried it once but I used garbanzo beans and the cornbread didn't cook all the way or something and it was just not good. But tonight my lovely and wonderful friend, Christine, (Hi, Christine!!) was visiting with her 4 kids and mentioned that they had tamale pie for dinner last night and everyone actually ate it with no complaint. She gave me a brief description of how she made it and I got inspired. So I threw caution to the wind and I made it myself with, brace yourselves, NO RECIPE! You know me, I never cook anything without a recipe. Actually, that's not true, I cheated a little and used my own whole grain cornbread recipe for the topping but, still, I'm making progress ;)

The verdict....the Allan clan LOVES tamale pie. All 4 kids ate it with great enthusiasm. There were even several instances of those magic words "I love this dinner" being spoken. Win!


Ingredients:

  • 1 tsp olive oil
  • 1 medium onion, diced
  • 1 large or 2 small carrots, shredded
  • 3 big handfuls of spinach torn into small pieces
  • 1 tsp cumin
  • 1 tsp salt
  • 1 tsp garlic powder
  • 1-2 Tbsp chili powder (I only used 1 because my family is wimpy about spice level)
  • 1 lb 93% lean ground turkey
  • 1 can no salt added diced tomatoes, undrained
  • 1 can black beans, drained and rinsed well
  • Optional- 1/2 cup shredded cheddar
Cornbread topping-

  • 3/4 cup whole grain cornmeal
  • 3/4 cup whole wheat flour
  • 1 1/2 tsp baking powder
  • 1/2 tsp salt
  • 2 Tbsp olive oil
  • 1/4 cup plus 2 Tbsp honey
  • 3/4 cup milk
  • 1 egg
ONE: Preheat oven to 400 degrees. Heat 1 tsp olive oil over medium heat in a large oven-proof skillet (if you don't have an ovenproof skillet, use whatever big skillet you do have and you will transfer to a baking dish before baking). Add onions, carrots, and spinach to the skillet and season with 1 tsp salt and pepper to taste. Sauté over medium heat until the onions are softened, about 8 minutes.

TWO: Add 1 lb ground turkey, 1 tsp garlic powder, 1 tsp cumin, and 1-2 Tbsp chili powder to the softened vegetables and cook until ground turkey is no longer pink.

THREE: Reduce heat to low and stir in undrained tomatoes and drained and rinsed black beans. Let simmer, uncovered, until the liquid is mostly gone.

FOUR: While the meat and veggie mixture is simmering, dump all cornbread ingredients into a medium bowl (I use a 4 cup measuring cup for easier pouring) and stir until no more lumps remain.

FIVE: Pour the cornbread batter evenly over the top of the meat and veggie mixture. (If you do not have an overproof skillet, spray a large casserole dish or 9x13 pan with cooking spray, transfer the meat and veggie mixture into it, and then pour the cornbread batter on top.) Bake in the preheated oven for 22-25 minutes or until the cornbread is golden brown and a toothpick inserted into the center comes out clean. If you are using the cheese, sprinkle it on top halfway through the baking time.

Freeze leftovers in single servings using the flash freeze method to feed your freezer stash.

NUTRITION INFO:
Per serving including cheese- 486 Calories (92 Calories from Fat), 10g Fat, 1g Saturated Fat, 55mg Cholesterol, 591mg Sodium, 1295 mg Potassium, 72g Total Carbs, 11g Dietary Fiber, 18g Sugars, 30g Protein, 84%DV VitA, 23%DV VitC, 22%DV Calcium, 30%DV Iron

Sauté veggies until soft, add meat
Add seasonings and canned tomatoes
Add back beans

Mix up the cornbread batter
Pour evenly over meat and veggie mixture
Bake about 10 minutes, top with cheese,
and continue baking another 12-15 mins
Nom, nom, nom
Here, Mommy, I'll hold your gloves for you
These are pretty fun! They make me want to....
Clap!!....
...and Flap!!!!
Oven mitts are so cool!!!!!!
:)

Sunday, July 20, 2014

Introducing Elowen Anthea Laurel!

I was busy for a while cooking up something extra special :) Meet our newest little addition, Elowen Anthea Laurel. The other three kids are completely smitten with her and we couldn't be happier.

Elowen Anthea Laurel, 2 weeks old
Liadan and Elowen
Theron and Elowen
Colwynn and Elowen
Every now and again I even get a chance to hold her. But it's usually when the other three baby hogs are in bed. That also happens to be when I do my blogging so please excuse my occasional typos as I am likely typing my posts one handed while nursing ;)

:)

Homemade Clean Eating Tacos (and Taco Shells)

Makes about 10 tacos, 1/4 cup filling per taco
Have you seen the Lego movie? We LOVE it! It was rainy and dreary this weekend so I let the boys watch it. They mention Taco Tuesday a bunch of times and Colwynn suddenly says, "What's a taco?" I realized I have never actually made tacos for dinner since he was born. I used to make them once a week when it was just Matt and I. What could be easier? Brown a little meat, stir in the package of mystery powder full of chemicals, and serve on a deep fried and probably partially made of plastic taco shell. Needless to say, that's probably why I haven't made them ;) But tonight I threw a homemade version together complete with shells and a hidden veggie. The kids loved them! The quiet dinner of everyone eating happily was totally worth the AMAZING mess produced by a 7, 5, and 2 year old eating tacos :) 

Since there is pureed spinach in with the meat the tacos are green. My family is used to a lot of their food being green so they didn't bat an eye but you could certainly omit the spinach if you don't want green tacos. My kids have no problem eating spinach raw, mixed in stuff, or in a salad but, the second I try to put it on a sandwich or in a tortilla or something, everyone complains. Even the biggest kid (remember when Matt actually requested I puree the spinach into the sloppy joes). So by pureeing it and adding it into the meat I can make sure that they are still eating a green veggie but I save myself all the whining. Then I eat mine with a big pile of spinach and feel extra good about my veggie intake for the day :)


Ingredients:
Taco filling-

  • 1 lb 93% lean ground turkey
  • 1 Tbsp dried minced onion
  • 1 tsp salt
  • 1 tsp chili powder
  • 1 tsp cumin
  • 1/2 tsp garlic powder
  • 1/4 tsp dried oregano
  • 1 T whole grain cornmeal (or whole wheat flour)
  • 1/2 cup water
  • 3 big handfuls spinach
  • Optional: 15oz can no salt added diced tomatoes, undrained
  • Optional: 15oz can black beans, drained and rinsed well
Taco shells-
  • Whole grain tortillas
  • cooking spray
ONE: In a large skillet over medium heat, brown the ground turkey until no longer pink. Drain the excess grease. 

TWO: Puree the spinach into the 1/2 cup of water and add it to the browned meat in the skillet with all of the seasonings and tomatoes and black beans if using. (Sometimes I don't feel like bothering with the mini blender so I just rip the spinach up into little pieces and throw it in as is. But still add the 1/2 cup of water). Mix well and continue to cook over medium heat until the sauce has thickened a bit, about 3-5 minutes.

Freeze leftovers in 1/4 cup portions using the medium/large portions method to feed your freezer stash.

To make homemade taco shells:
Turn a muffin pan upside down. Spray both sides of the tortillas lightly with cooking spray and wedge between the cups of the muffin pan so that they are standing upright and look like taco shells. Bake in a preheated 350 degree oven for 15-17 minutes until crispy and golden brown.

Nutrition Info:
Per 1/4 cup taco filling- 72 Calories (30 Calories from Fat), 3.4g Total Fat, 1g Saturated Fat, 0g Trans Fat, 32mg Cholesterol, 278mg Sodium, 213mg Potassium, 1.3g Total Carbohydrates, 9.3g Protein, 19% DV VitA, 5% DV VitC, 2% DV Calcium, 7% DV Iron

Brown meat, drain, add pureed spinach and seasonings

Spray tortillas with cooking spray and line up on an inverted muffin tin.
Bake at 350 for 15-17 minutes.

:)  


Monday, May 19, 2014

Clean Eating Creamy Coconut Cilantro Lime Chicken Soup

Makes about 12 servings, 1 cup each
In our house we affectionately call this Colwynn Soup because Colwynn's two favorite flavors are coconut and cilantro. He is his mother's son :) This soup is creamy and tangy and just plain delicious.  Plus it is super fast to throw together if you've got leftover cooked chicken and brown rice. When I'm really in a good make-ahead groove, I will cook a whole chicken in the crockpot once a week like this because there are so many things you can do with a pile of shredded, cooked chicken. Or, if I am being lazy, Matt picks up a rotisserie chicken on his way home from work ;)

NOTE: I use a can of coconut milk and then a can full of regular milk plus some coconut extract. You could of course use two cans of coconut milk and skip the regular milk or 4 cups of regular milk plus 2 tsp of coconut extract and skip the coconut milk. Or if you don't care for coconut, do regular milk and skip the extract. 


Ingredients:
  • 2 Tbsp olive oil
  • 2 large carrots, diced small
  • 3 cups chopped broccoli (I used frozen)
  • 1 tsp curry powder
  • 1/2 tsp cinnamon 
  • 1/4 tsp ginger
  • 1/2 tsp paprika
  • 4 cups chicken broth
  • 1 bunch fresh cilantro
  • 15oz can coconut milk
  • 2 cups milk of choice (I just pour regular milk into the now empty coconut milk can instead of measuring out 2 cups)
  • 1 tsp coconut extract
  • 3 Tbsp lime juice
  • 1 Tbsp soy sauce
  • 3 cups shredded, cooked chicken
  • 3 cups cooked brown rice
ONE: Drizzle the olive oil into a large pot and add the carrots, broccoli, curry powder, cinnamon, ginger, and paprika. Stir well to coat and cook over medium heat, covered, stirring occasionally for about 10 minutes or until veggies have softened.

TWO: In a blender, puree the cilantro into the chicken broth. Once veggies are soft, add all remaining ingredients to the pot. Bring to a boil, reduce heat to low, and let simmer 5 minutes.
Freeze leftovers in 1-cup portions using the medium/large portions method to feed your freezer stash.

Nutrition Info:
Per 1 cup serving- 253 Calories (110 Calories from Fat), 12g Total Fat, 7g Saturated Fat, 0g Trans Fat, 33mg Cholesterol, 416mg Sodium, 478mg Potassium, 19g Total Carbohydrates, 2g Dietary Fiber, 3g Sugar, 18g Protein, 48% DV Vit A, 38% DV Vit C, 9% DV Calcium, 14% DV Iron

:)

Monday, April 28, 2014

Clean Eating Whole Grain Oven Baked Pancakes

Makes 8 servings
My kids love pancakes and about once a month I will make a big batch of these ones or these ones. But some mornings I am feeling slow and lazy or we have woken up particularly late and I don't feel like taking the time to mix up the batter and stand over the griddle. Oven baked pancakes to the rescue!! These are light and fluffy and the best part is it only takes me a few minutes to mix the batter up the night before. In the morning I just throw some fruit on top and shove them in the oven. While they are baking I am hands free to make everyone their morning tea and maybe even unload the dishwasher.

Note: You can of course just make these in the morning without letting the batter sit overnight.

Banana Coconut
Peach (you know you're jealous of my Elmo plate)
Ingredients:
Pancakes-
  • 2 cups whole wheat flour
  • 3 Tbsp sucanat or natural sweetener of choice (can use brown/white/turbinado sugar but it won't be "clean")
  • 1 tsp baking soda
  • 1 tsp baking powder
  • 1/4 tsp salt
  • 1 large egg, beaten
  • 1 1/2 cups milk of choice
  • 3 Tbsp oil of choice
  • 1 tsp vanilla extract (or different extract depending on which fruit you are using for topping)
Topping-
  • 2 Tbsp sucanat or natural sweetener of choice (can use brown/white/turbinado sugar but it won't be "clean")
  • sprinkle of cinnamon 
  • fruit of choice-
    • 2 thinly sliced apples
    • 2 thinly sliced peaches (I sprinkle a little nutmeg on with the cinnamon when I use peaches)
    • 1/2 cup blueberries/sliced strawberries/other berries
    • 1/2 cup chopped cherries (I use almond extract instead of vanilla when I use cherries)
    • 1 large/2 small bananas, thinly sliced (I use coconut extract instead of vanilla and sprinkle some dried, unsweetened coconut on with the cinnamon when I use bananas) 
ONE: Whisk together all the pancake ingredients. Lightly mist a 9x13" pan with cooking spray and spread the batter evenly in the pan. Cover and refrigerate overnight (if cooking right away omit the covering and refrigeration).

TWO: Preheat oven to 350F. Spread fruit of choice evenly over the batter and then sprinkle with the sucanat and cinnamon. 

THREE: Bake 25-30 mins until the edges are lightly browned and the top springs back when touched. Cut into 8 squares and serve warm. 

Freeze leftovers using the flash freeze method to feed your freezer stash.

Nutrition Info:
Per pancake not including the topping- 200 Calories (56 Calories from Fat), 6g Total Fat, 1g Saturated Fat, 24mg Cholesterol, 268mg Sodium, 182mg Potassium, 30g Total Carbohydrates, 1g Dietary Fiber, 5.5g Sugars, 5.5g Protein, 2%DV VitA, 1% DV VitC, 9% DV Calcium, 9% DV Iron

:)

Saturday, March 1, 2014

Clean Eating Whole Grain Chocolate Peanut Butter Pancakes

Makes about 30 pancakes
There are few food combinations we like better than peanut butter and chocolate so these were a great Saturday morning treat in our house. Plus by adding some peanut butter to the batter, it boosts the protein and keeps the kids full longer. Does anyone else feel like they spend 75% of their day feeding their children?! Some days I will not even be done cleaning up the breakfast dishes before someone is asking me if it is lunch time yet. I automatically doubled the recipe I based these off of so that I would have some to freeze and eat throughout the week but, if for some crazy reason you DON'T want 30 pancakes, just halve it. 

Not surprisingly, the kids all scarfed these down. And it took my hungriest kid a whole hour to ask if it was lunchtime yet. They did, however, ask why they weren't green. When I make pancakes I always blend half a bag of fresh spinach into the batter but this morning I was lazy. It would certainly work with this recipe, though. 


Ingredients:
  • 1 1/2 cups whole wheat flour (I used King Arthur's White Whole Wheat)
  • 1 1/2 cups rolled oats
  • 1/4 cup sucanat/honey/pure maple syrup (can substitute white/brown/turbinado sugar but it won't be "clean")
  • 2 Tbsp baking powder
  • 1 tsp salt
  • 1/4-1/2 cup PB2 powdered peanut butter OR 1/2 to 1 cup natural peanut butter (depending on how peanut-buttery you want it. I used a 1/2 cup PB2 because, when I make something that is supposed to be peanut butter flavored, I like that to be the dominant flavor. But we are kind of partial to peanut butter.)
  • 2 1/2 cups milk of choice
  • 1/2 cup apple sauce (can omit if using regular peanut butter instead of powdered)
  • 2 eggs
  • 2 tsp almond/vanilla extract
  • 1/4 cup ground flax seeds (optional but it thickens the batter a bit)
  • 1/4-1/2 tsp ground nutmeg (optional)
  • 1/2 a bag of fresh spinach (optional)
  • chocolate chips (technically optional. You could sub blueberries or raisins or pieces of banana or something instead)
ONE: In a large bowl combine all dry ingredients except chocolate chips. Mix well, then add in the liquid ingredients. Mix well and let sit a few minutes to thicken. (If using spinach, blend it up into the milk before adding the milk in or I just dump it into the batter and blend it in with my immersion blender.)

TWO: Pour batter by the 1/4 cupful onto hot griddle. (I have an electric griddle and I set it to 350. Regardless of what type of griddle/pan you use, a good rule of thumb is that it's preheated when you flick a drop of water onto the surface and it imediately sizzles and dances around.)

THREE: Drop 6 or 8 chocolate chips on each pancake in a circle with one in the middle. (I do it this way instead of mixing them into the batter because then I can space them out so each bite has just enough chocolate to seem indulgent. Plus everyone’s pancake has the same number of chocolate chips and no one fights for a particularly chocolatey one… Matt.)

FOUR: When the top is bubbly and almost set, flip and cook another minute or so until both sides are golden brown.


Freeze leftovers using the flash freeze method to feed your freezer stash.

NUTRITION INFO:
Per pancake made with 1/2 cup PB2, skim milk, ground flax, and no spinach- 89 Calories (19 Calories from Fat), 2g Total Fat, 0.8g Saturated Fat, 0g Trans Fat, 12mg Cholesterol, 109mg Sodium, 184mg Potassium, 14g Total Carbohydrates, 1.5g Dietary Fiber, 5.4g Sugars, 3.5g Protein, 1% DV VitA, 0% DV VitC, 8% DV Calcium, 4% DV Iron

Per pancake made with 1 cup natural peanut butter, skim milk, ground flax, and no spinach- 135 Calories (55 Calories from Fat), 6g Total Fat, 1.6g Saturated Fat, 0g Trans Fat, 12mg Cholesterol, 98mg Sodium, 181mg Potassium, 14.7g Total Carbohydrates, 2g Dietary Fiber, 5.4g Sugars, 5.5g Protein, 1% DV VitA, 0% DV VitC, 8% DV Calcium, 10% DV Iron

My lovely assistant. "If I just stretch out a little bit maybe I can swipe one."
(Notice the fork in her left hand, ready for action)
Never mind the spatula, let's see if I can just get a bite on my fork.
Almost there...... Darn these short baby arms and mean Mommy
putting my stool JUST far enough away
:)

Friday, October 4, 2013

Clean Eating Quick and Easy Stir Fry with Peanut Sauce

Serves 4

Hi. This isn't going to be all fancy and nicely formatted. I'm putting it on here quickly simply because I threw it together tonight, I loved it, Matt loved it, my kids ate it with minimal complaint, and I don't want to forget how to make it. I love many things about Japan but one of the things I love most is the plethora of fresh food. It is a big part of the culture. Many people here don't do one big grocery shop a week or every two weeks like in the states. Instead they buy things fresh every day or every other day. I always want to just run into my local Japanese grocery store and grab some things to throw together a quick stir fry. But I am incapable of cooking anything without a recipe. Well tonight I went for it!!!!

The kids and I had been at my friend Christine's house all day (hi, Christine!!) and we were planning to eat dinner there. (She made spaghetti squash with chicken, parmesan, and avocado! That will be a post for another day.) Matt suddenly texted to let me know he would be coming home after all. So we hopped into the car and I ran into the store on the way home. I had nothing remotely in mind for dinner so I thought tonight would be the night to just go for it!

White meat chicken is dirt cheap here  since they prefer dark meat so I grabbed some chicken tenderloins. Then I perused the discount produce bin. They put stuff in there significantly marked down that is still perfectly good but has to be used today. I grabbed a bunch of asparagus (for 50 cents!!!), a bunch of some kind of leafy green veggie, and a little package of 4 of what I think are some kind of onion but they were about the size of shallots. Then I grabbed a package of fresh soba noodles (I know you're jealous!) and a bag of what I think was thinly sliced carrots mixed with bean sprouts. Here is what I did with it all:

Ingredients:

  • 1 lb of lean protein (I used chicken breast)
  • 4 servings of a precooked complex carbohydrate (you could use brown rice or whole wheat angel hair pasta. I used the soba noodles)
  • variety of veggies (I used the asparagus, onions, carrots, leafy greens, and bean sprouts)
For the sauce-
  • 1/4 cup water/broth (I used water)
  • 1/4 cup low sodium soy sauce (less if you don't want it as salty)
  • 1/4 cup natural peanut butter (can omit or sub a different nut butter or I bet tahini would be delicious)
  • 1/8 cup honey (or mirin if you live in Japan!)
  • Tbsp lemon/lime juice
  • 1 tsp minced garlic or 1/2 tsp garlic powder
ONE: Cut the protein up into bite sized pieces and brown it in a skillet/wok in a little bit of oil (I used olive oil) over medium heat, stirring occasionally.

TWO: While the protein is cooking, whisk the sauce ingredients together. (I did this in a one cup measuring cup so I could measure as I went and then not make two things dirty :)

THREE: Once the protein is cooked, remove from pan, and add a little bit more oil. Throw your slower cooking veggies in first (like asparagus, carrots, or broccoli) and stir fry about 3 minutes. Then add your faster cooking veggies (like onions and bean sprouts) and cook until tender crisp. If using leafy greens, throw them in during the last minute of stir frying.

FOUR: Once veggies are done, add your protein back into the pan along with your complex carbohydrate (in my case the soba noodles) and dump in the sauce. Stir it all and let it cook a little bit until the sauce starts bubbling. Let the sauce bubble for a minute or so until it is heated through and the sauce is your desired thickness (more bubbling equals thicker sauce).

This isn't specifically a freezer recipe but I fully intend to mix up several batches of the stir fry sauce and freeze them using the medium/large portions method. That way I can pop them in the fridge in the morning to defrost during the day and save myself the measuring when dinner time comes around :)

Nutrition Info:
This is just for the sauce since the actual stir fry ingredients will vary. You could use this sauce for 4 portions or certainly stretch it to cover 6 portions.

4 Servings - 143 Calories (72 Calories from Fat), 8g Total Fat, 1.5g Saturated Fat, 0mg Cholesterol, 535mg Sodium, 13g Total Carbs, 1g Dietary Fiber, 10g Sugar, 6g Protein, 0% DV VitA, 3% DV VitC, 1% DV Calcium, 4% DV Iron

6 Servings -95 Calories (48 Calories from Fat), 5g Total Fat, 1g Saturated Fat, 0mg Cholesterol, 357mg Sodium, 9g Total Carbs, 1g Dietary Fiber, 7g Sugar, 4g Protein, 0% DV VitA, 2% DV VitC, 0% DV Calcium, 3% DV Iron

Tuesday, April 23, 2013

Clean Eating Creamy Cauliflower and Sausage Casserole

Makes about 6 servings, 1 1/2 cups each
Yum, yum, YUM! I got the idea for this recipe in part from a post on my friend, Mandy's, facebook page. Mandy is my super awesome friend who creates all kinds of scrumptiously delicious things in her kitchen. She's the kind of friend that drops off muffins on your doorstep in the morning or comes to visit you after you have a baby, brings a whole bunch of food, and then forces you to sit down and eat while she does your dishes or something. 

Anyway, Mandy follows the Paleo Diet now and she posted a recipe for a Buffalo Chicken Cauliflower Casserole. I loved the idea of a casserole featuring veggies as the main ingredient but I didn't have any chicken and we are pretty wimpy about spicy things in our house. So really the only thing I took from the recipe was how to cook the cauliflower to start the casserole LOL. The end result was totally different but SOOOOOOOO good. Creamy and savory with a crispy parmesan crust. 

I inhaled my bowl and the boys were equally enthusiastic. The baby started dancing in her high chair after the first bite and then growled at me if I put her spoon down for a minute to get my own bite. (If you want to see what she looks like when she is NOT growling, make sure to scroll to the bottom!) I will admit that the boys and I each had a piece of homemade whole wheat bread and butter with our servings (so no Paleo for us!) but it was only because the bread had just finished baking and we had been smelling it for an hour. We would have been more than satisfied with just the casserole. 


Ingredients:

  • 14 oz package frozen cauliflower or 1 head fresh cauliflower, chopped (about 4 cups)
  • 2 Tbsp and 1 tsp olive oil, divided
  • 1 tsp salt
  • 1/2 tsp nutmeg
  • 1/2 tsp sage
  • 1 medium onion, finely diced
  • 1 parsnip, peeled and finely diced
  • 1 large carrot, peeled and finely diced
  • 12oz all natural, nitrate free chicken sausage links, sliced into medallions (I used Saag's Naturals Chicken Apple)
  • 4 big handfuls spinach
  • 1/2 cup low sodium chicken stock (could use chicken broth or vegetable broth)
  • 1/2 cup silken tofu
  • 1 tsp lemon juice
  • 1/2 cup shredded part skim mozzarella
  • 1/2 cup grated parmesan cheese, divided
ONE: Preheat oven to 400. Dump the cauliflower into a large baking dish and pour 2 Tbsp olive oil over the top. Sprinkle with salt, nutmeg, and sage and stir well until all of the cauliflower is coated with oil and seasonings. Bake 30 minutes, stirring once in the middle, until cooked through and starting to brown.

TWO: While the cauliflower is cooking, throw the onion, parsnips, and carrots into a large saute pan with the remaining 1 tsp of olive oil. Stir well, cover, and cook over medium heat until onion is translucent and veggies have softened, about 10 minutes.

THREE:  Add the sausage and spinach and cook, stirring often, until the spinach has wilted and the sausage is slightly browned, about 4 minutes. (I used fully cooked sausage so if you are using raw sausage, cook it until the sausage is mostly cooked. You are going to bake the final dish so a little pink is okay.)

FOUR: Whisk the tofu and lemon juice into the chicken stock. (I used homemade chicken stock that had no added salt so I added 1 tsp of low sodium soy sauce to the mixture.) Pour it over the veggie mixture along with the shredded mozzarella and 1/4 cup parmesan cheese. Stir well and heat through until the cheese has melted, about 2 minutes.

FIVE: Add the sausage mixture into the baking dish with the cooked cauliflower. Mix well, breaking up any large pieces of cauliflower as you stir. Sprinkle the remaining 1/4 cup of parmesan cheese over the top and bake, covered, for 15 minutes. Uncover and bake an additional 5 minutes or until the parmesan cheese is bubbly and golden brown.

Freeze in 1 1/2 cup portions using the medium/large portions method to feed your freezer stash.

Nutrition Info:
Per 1/12 cup serving- 278 Calories (130 Calories from Fat), 14g Fat, 4.5g Saturated Fat, 60mg Cholesterol, 920mg Sodium, 16g Total Carbohydrates, 5g Dietary Fiber, 3.5g Sugars, 19.5g Protein, 87% DV VitA, 50% DV VitC, 21% DV Calcium, 13% DV Iron

Toss cauliflower in a baking dish with olive oil, salt, sage, and nutmeg.
While cauliflower is baking, saute carrots, parsnips, and onions
Once veggies are cooked, add sausage...
...and a heaping pile of spinach :)
Whisk tofu and lemon juice into chicken stock
Cauliflower is done when it is softened and starting to brown
Add stock mixture, mozzarella, and half of the parmesan to sauteed veggies
Combine with cooked cauliflower, stir well, and top with remaining parmesan
Bake covered for 15 mins and uncovered for 5 until top is crusty and bubbly
Liadan enjoyed a bath in the sink while I chopped veggies. How's that for multitasking?
One more perk of my super cool Japanese house! 
:)