Thursday, October 25, 2012

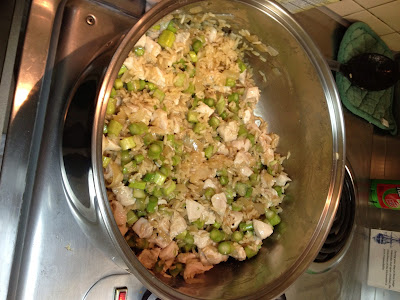
Clean Eating Brown Rice Risotto with Chicken and Asparagus

Makes about 6 servings, 1 cup each
Risotto sounds so gourmet. It makes you think of warm, creamy deliciousness. It’s also usually loaded with fat and really bad for you. I have always wanted to make risotto but never have because it seemed like so much work. But we’re still living in the hotel so I’m being pushed out of my comfort zone to try new stove-top things. This is one I’m so glad I tried!! I got the idea in part from my friend, Naomi (hi Naomi!), and from Anna’s comment on the call for help post (hi Anna!). And guess what... it was NOT a lot of work! In fact it was ridiculously quick and easy. It did take a while to cook but all I had to do for most of the time was just stir it occasionally. Plus my whole family loved it. 

This is for sure going on our make-frequently list. It was a warm bowl of creamy comfort-food goodness but still super good for you. Also it’s a whole grain, lean protein, and super green veggie all in one bowl. You know how much I love that :) If I was not living in a hotel when I made this I probably would have added a little bit of garlic in with the onions. Also I know adding poultry seasoning is kind of random but I had some left over from when I made the Cornish game hens in the crockpot. It worked but you could definitely substitute your own favorite herbs if you don’t have poultry seasoning. (Speaking of random, how weird is it that the minimart DID have poultry seasoning?!) 


Ingredients:

  • 1 Tbsp olive oil, divided 
  • 1 lb boneless, skinless chicken breast trimmed of all visible fat and cut into bite sized pieces 
  • ½ onion, diced 
  • 1 cup brown rice 
  • 2 cups chicken broth 
  • ¼ cup 1% milk 
  • 1 bunch fresh asparagus, cut into ½ inch pieces 
  • 1 tsp poultry seasoning 
  • ¼ cup grated Parmesan cheese

ONE: In a large saucepan, heat ½ Tbsp of the olive oil over medium heat and brown the chicken. Once it’s cooked through, remove it from the heat and set aside.

TWO: In the same pan (especially if you are living in a hotel and therefor having to hand wash everything!) sauté the onions in the remaining ½ Tbsp of olive oil making sure to scrape the bottom of the pan. Once the onions are slightly tender and almost translucent, add the rice and toss to coat.

THREE: Pour in the chicken broth slowly while stirring. (Usually when you are cooking brown rice or other grains you don’t want to stir at all because it breaks down the outer sheath and makes them gummy but for risotto this is a good thing.)


FOUR: Bring everything to a boil, reduce heat to low, cover and simmer for 50 minutes, stirring occasionally, or until rice is tender. (I stirred about every 10 minutes.)

FIVE: Stir in the asparagus, cooked chicken, poultry seasoning, and ¼ cup milk and continue to cook for 10 minutes.


SIX: Remove from heat, stir in the Parmesan cheese, and let it sit covered for a few minutes.

Freeze leftovers in 1 cup portions using the medium/large portions method to feed your freezer stash.

NUTRITION INFO:
Per 1-cup serving – 297 Calories (65 Calories from Fat), 7g Fat, 2g Saturated Fat, 68mg Cholesterol, 277mg Sodium, 27.6g Total Carbohydrates, 2g Dietary Fiber, 2g Sugars, 29g Protein, 8% DV Vit A, 5% DV Vit C, 10% DV Calcium, 14% DV Iron

:)

Tuesday, October 16, 2012

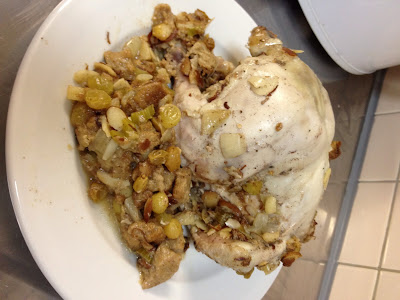
Clean Eating Crockpot Cornish Games Hens with Apple Almond Whole Wheat Stuffing

Makes 6 Servings
This past Sunday I sat in my hotel room and skinned chickens. As I was doing this I wondered if anyone else in the world was skinning chickens in their hotel room at that time. I think the answer is probably no :) But right now we are living in a hotel in Japan while we wait to move into our house. We still want a home-cooked meal every night but I have no car yet so I am limited to what I can buy at the minimart next door. The only meat options at the minimart are hotdogs, bacon, breakfast sausage, and Cornish game hens. I have no idea why they sell Cornish game hens at the minimart but I was actually pretty excited to see them since I wasn't about to buy the hotdogs.

This was so easy to make and tasted great! I cook a whole chicken in the crockpot about once a week (you know, when I'm not living in a hotel in a foreign country) so I knew I would get nice, tender,  fall-off-the-bone meat. But I wanted a side to go with it without having to do much extra work. Stuffing was an obvious choice and this particular combo was no fuss and easy to toss together. 

Our three-year-old, who is going through the typical phase of insisting that he doesn't like anything I cook (even though he still clears his plate every night anyway), actually said, "Ooooooh, this is yummy.... I love this... Can we have it again?" Big compliments! And yes, we will definitely be having it again :)


Ingredients:
  • Medium-sized apple, chopped (about 1 cup)
  • 3/4 cup sliced almonds
  • 1/2 cup diced onions
  • 1/2 cup celery, chopped
  • 2 tablespoons butter (of course you could use olive oil but I'm okay with butter every now and again since it is technically clean)
  • 1 teaspoon cinnamon
  • 1/2 teaspoon poultry seasoning
  • 1/4 teaspoon salt
  • 4 slices of whole wheat bread cut into cubes, about 3 cups
  • 1/2 cup raisins
  • 2/3 cup chicken broth, divided
  • 2 Cornish game hens, giblets removed and rinsed clean (I also skinned mine because I don't like the idea of them cooking in their own fat all day. Also the skin doesn't crisp in the crockpot like it does in the oven which makes it not worth the extra fat and calories to me. But you can leave the skin on if you prefer.)
ONE: Melt butter in a pan and saute apples, almonds, onions, and celery for 5 minutes until onions begin to soften. Toss the bread cubes in a bowl with the raisins, cinnamon, poultry seasoning, and salt.


TWO: Add the sauteed apple mixture into the bread cube mixture and mix well. Add 1/3 cup of broth and stir to moisten.


THREE: Spoon the stuffing mixture into the chickens and fold the legs together to hold it in. Place chickens in crockpot and sprinkle remaining stuffing mixture around the outside. Pour the remaining 1/3 cup broth over the chickens, making sure that the stuffing sprinkled around the chickens is nice and moist.


FOUR: Cover and cook on low for 5 to 7 hours or until chicken is cooked through. I used a slotted spoon to scoop the extra stuffing out of the crockpot once I took the chickens out because I didn't want my stuffing to be too soggy. If I was not living in a hotel with limited ingredients I would have cut up some kale really small and mixed it into the raw stuffing. It would look like parsley and no one would know :)

One chicken fed me, my husband, and our two toddlers. The adult serving size for the stuffing was about 2/3 cup. To freeze the leftovers I would suggest removing the chicken from the bones and freezing it in usable portions in ziploc baggies, such as 1/2 or 1 cup portions. Freeze any leftover stuffing in 2/3 cup portions using the medium large portions method.

NUTRITION INFO

Per 1/3 of a chicken and 2/3 cup stuffing - 278 Calories (110 Calories from Fat), 12g Fat, 3.6g Saturated Fat, 49mg Cholesterol, 253mg Sodium, 31g Carbohydrates, 6g Dietary Fiber, 13g Sugar, 15g Protein, 4%DV Vit A, 5%DV Vit C, 8%DV Calcium, 10%DV Iron

:)

Monday, October 15, 2012

We made it!... and a call for HELP!

Kon'nichiwa!! We made it safely to Japan! :) We've been here about 2 weeks now. I can't tell you much about the country yet because we arrived in the middle of a typhoon so we couldn't see anything on the bus ride to our new base (never a boring day with this family). We were sleeping anyway because we had been traveling for almost 24 hours at that point... with two toddlers and a newborn. Fun.

We haven't had much time for exploring yet. However, in the short time we've been here, we managed to find a really cool house and we are hoping to get to moved in by the end of the month. In the meantime, we are living in a hotel.... with the toddlers and the baby. Also fun.

Our room technically has a kitchen area but it is VERY basic considering we will probably be living here for at least a month. I have two burners,  a microwave, a sink, a mini-fridge, and a toaster. No oven. I never realized just how much I relied on my oven until I was faced with trying to feed a family of five with no oven (okay technically the baby doesn't eat table food but family of five sounds more dramatic). I will admit, I cheated and borrowed my friend's crockpot.

Here is our "kitchen":


And here are all of the tools I have to work with:


You may be asking yourself, can you eat healthy living in a hotel room in a foreign country? I am determined for the answer to be yes and that we will still eat three healthy meals a day even though I have no freezer to fall back on. (I've discovered that you can also cloth diaper a newborn and homeschool a Kindergartener and First Grader in a hotel room but that's a post for another day.) It will take some planning, though. In addition to the small kitchen and minimal tools, we have no car yet so I am limited to what's available at the minimart next door or what I can carry from the commissary on the bus by myself with the three kids. And it should be pretty easy to throw together because I'm slightly insane by the end of the day when I'm supposed to be cooking since I'm living in a tiny hotel room with all of my kids. But at least I will be a well-fed insane person. (Insert maniacal laughter).

So here's where the call for help part comes in. I would love any suggestions you have for simple but healthy stove top meals with minimal ingredients. Even if it's not clean, post it in the comments or email it to me anyway and I'll clean it up. Here is what we have eaten so far (notice it's mainly crockpot. Seriously, I need stove-top meal help!):

Whole grain pasta with all natural spaghetti sauce
Black Bean Salsa Soup (un-pureed since I have no immersion blender)
Crockpot Cornish Game Hens with Apple Almond Stuffing
Chicken and Asparagus Brown Rice Risotto
Mahi Mahi Coconut Soup

Thanks!!!!

:)

Monday, August 13, 2012

I'm still here!!

Hello! I have not disappeared off the face of the earth :) I've received quite a few messages and comments lately wondering if I'm going to continue the blog. I am!!! I've been taking a little break since my last post in mid-January. I was finishing our first year of homeschool and gearing up for my last season teaching survival swim lessons in Pensacola. This swim season was even busier then last year and then in June we had a new baby girl :)

Liadan Allison Laura, 1 week old
I took 3 weeks off then taught 3 more weeks of lessons before we left Pensacola to move to Japan! We're taking a circuitous route to Japan via Rhode Island and England because Matt has a class he has to take and then we're taking an extended vacation. It's always an adventure in this house!! I hope to be settled in Japan and blogging again by the end of October. In the meantime I'm going to be enjoying having nothing to do all day but hang out with my three favorite little people. Look for me in October!


P.S. Aren't these pics of my kids awesome?!?! I know I'm a little biased of course :) But if you live in Pensacola and want awesome pics of your kids/family/dog/business/wedding/etc like these ones, contact my awesome friend, Elishia, with EBouley Photography at 850-686-5580 or EBouleyPhotos@gmail.com. You won't be disappointed!

Tuesday, January 17, 2012

Clean Eating Chicken Tortilla Soup (OAMC)

Makes about 10 servings, 1 cup each
As I've said time and time again, we eat a lot of soups in our house. It's a perfect medium to throw all kinds of veggies into which get happily eaten unnoticed. And all of my boys (even the biggest one) love anything they can dip tortilla chips into. I'm pretty sure Matt would eat this or Black Bean Salsa Soup every single night if I let him.


There are a TON of different ways you can make tortilla soup but two interesting things about this recipe are the addition of cornmeal and okra. The cornmeal gives the soup a nice texture and rounds out the flavors. Also combining a bean with a whole grain makes a complete protein. Okra is a vegetable that people don't often think about unless they're frying it. I'll admit that until we moved down south I had never heard of it. Back when I was first making baby food for Colwynn I learned that Okra is actually a power packed green vegetable and it also thickens the soup nicely. No one in my house is very fond of slices of okra in soup, though, so I cook it and puree it before stirring it in. 
Update: Instead of precooking and pureeing the okra now, I just cook it right in the soup and then puree it after I take the chicken out to shred it


Ingredients:

  • 1 Tbsp olive oil
  • 1 cup diced onion (any kind will do)
  • ½ cup diced bell pepper (any color)
  • 2 cups sliced okra (I use frozen)
  • 1 1/2 tsp minced garlic (3 cloves)
  • 1 1/2 tsp cumin
  • 1 tsp chili powder
  • 1/2 tsp garlic powder
  • 1/2 tsp salt
  • 15 oz can diced tomatoes
  • 4 cups low sodium chicken broth
  • 3 Tbsp tomato paste
  • 4 cups water 
  • 2 15 oz cans black beans, drained and rinsed well 
  • ¼ cup whole grain cornmeal
  • 2 boneless, skinless chicken breasts 
  • 5 wholegrain corn tortillas, cut into strips (optional)

ONE: Heat olive oil in a large pot over medium high heat. Add onions, pepper, okra, garlic, cumin, chili powder, garlic powder, and salt. Cook 5 minutes or until veggies begin to soften.

TWO: Add in diced tomatoes, chicken stock, tomato paste, and water. Bring to a boil, then reduce heat to a simmer. Add in chicken breasts and cornmeal and cook, uncovered, 20-25 minutes or until chicken is cooked through. Stir every few minutes for the first 10 minutes, scraping the bottom, to make sure the cornmeal doesn't settle to the bottom and stick.

THREE: Remove chicken from pot. If you don't want chunks of okra, use an immersion blender to puree the soup mixture still in the pot. Allow soup to continue simmering while you shred the chicken using two forks.

FOUR: Return shredded chicken to pot, add the beans, and let simmer another 5 minutes until heated through. Remove from heat, and let sit for 10-15 minutes before serving. If using tortilla strips, stir them in 5 minutes before serving.

Serve garnished with sliced avocado, shredded cheddar cheese, fresh cilantro, a drizzle of lime juice, or even a spoonful of plain yogurt. My boys like to dip tortilla chips into it instead of having the corn tortillas stirred in. Freeze leftovers in 1 cup portions using the medium/large portions method to feed your freezer stash.

NUTRITION INFO:
Per 1-cup serving without tortilla strips or garnishes - 190 Calories (35 Calories from Fat), 4g Total Fat, 1g Saturated Fat, 27mg Cholesterol, 397mg Sodium, 22g Carbohydrates, 6g Dietary Fiber, 4g Sugars, 15g Protein, 11% DV Vitamin A, 27% DV Vitamin C, 5% DV Calcium, 39% DV Iron

:)

Monday, January 9, 2012

Clean Eating Cherry Almond Dutch Baby Pancakes (and how to pit fresh cherries without a cherry pitter)

Makes 6 servings, 1 slice each
This is another variation of the Peach Dutch Babies that I recipe tested for the April/May 2011 issue of Clean Eating Magazine. It was delicious with peaches, we loved it with pineapple and coconut, and this morning we had cherries so I thought I'd give it a try. 


A Dutch Baby is an oven baked pancake which is kind of a blend between a popover and a crepe. The boys voted this one as their favorite version and I have to agree :) But I REALLY love fresh cherries so I might be a little biased.


Ingredients:
  • 3 large eggs
  • ¾ cup low-fat milk
  • 2 tbsp pure Maple syrup
  • ½ tsp almond extract
  • ¼ tsp plus a pinch sea salt
  • Large pinch nutmeg
  • ½ cup whole-wheat pastry flour (I just use King Arthur’s White Whole Wheat flour)
  • 2 Tbsp coconut oil
  • 1 cup sliced cherries
  • 2 Tbsp slivered almonds (although the boys and I had it with pecans because we didn't have any slivered almonds LOL)
ONE: Place a heavy, 12-inch oven-proof or cast-iron skillet in the oven and preheat to 425°F. (If you don't have an oven-proof skillet, you can use a baking dish. You'll need something a bit bigger than an 8x8 square pan but a 9x13 is about as big as you could go.)

TWO: In a large bowl, lightly beat eggs. Add milk, Maple syrup, almond extract, salt and nutmeg; whisk to combine. Add flour and whisk just until blended (a few lumps are fine).

THREE: Carefully add coconut oil to the skillet in the oven. Close the door, and allow it to melt, about 1 to 2 minutes. Wearing a heat-proof glove or oven mitt (I wear my Ove Glove), remove the skillet from the oven and pour the melted oil into the batter; whisk just until blended (do not over mix).

FOUR: Pour the batter back into the hot skillet and sprinkle evenly with the sliced cherries. Carefully return skillet to oven and bake until edges are puffed and golden brown, 17 to 19 minutes.


FIVE: When the pancake is done, sprinkle it with the almonds. It’s pretty impressive when it’s all puffed up fresh out of the oven. Call everyone to the table right away because it deflates pretty quickly. My boys like to peak through the window on the oven door to watch it puff up. They call this Magic Eggy Pancakes.

Not only do I get to eat a delicious pancake... staring at it through the oven door
keeps Theron entertained for 20 minutes and I get to see this excited little face :)

You won’t have leftovers but, if you did, you could freeze individual servings using the flash freeze method to feed your freezer stash.

QUICK TIP: I don't have a cherry pitter. We all love cherries and I am eagerly looking forward to the day that I can just hand my kids a bowl of cherries and send them outside to happily eat them and spit out the pits. Until that day comes, this is how I get around the pits:

Wash the cherry, pull off the stem, and stand it up on the cutting board.
Slice of the fruit on either side of the pit
Finally cut off the little bits of fruit left around the pit.
Discard the pit and enjoy!

NUTRITION INFO:
Per serving - 162 Calories (71 Calories from Fat), 8g Fat, 5g Saturated Fat, 94mg Cholesterol, 141mg Sodium, 18g Total Carbohydrates, 2g Dietary Fiber, 9g Sugars, 6g Protein, 4% DV Vitamin A, 2% DV Vitamin C, 6% DV Calcium, 5% DV Iron

:)

Thursday, January 5, 2012

Clean Eating Whole Wheat Taco Bowls

These are so quick and easy to make but they are a fun twist on a regular old taco. Plus I find it next to impossible to find healthy, whole grain taco shells. My kids think these are fun because they can break apart their bowl and eat it as they go. Actually, Matt likes them for that same reason :) We use them to make taco salads using Salsa Barbeque Chicken.


Ingredients:
  • One tortilla per person
  • Olive oil cooking spray
ONE: Preheat the oven to 350. Place small, oven safe bowls or balls of tin foil on a cookie sheet. 


TWO: Mist both sides of the tortillas with cooking spray and drape them over the bowls/foil balls. 


THREE: Bake for 17-20 minutes or until light brown and crispy.

NUTRITION INFO:
Per Taco Bowl- 130 Calories (25 Calories from fat), 3g Total Fat, 1g Saturated Fat, 0mg Cholesterol, 280mg Sodium, 22g Carbohydrates, 3g Dietary Fiber, 2g Sugars, 4g Protein, 0% DV Vitamin A, 0% DV Vitamin C, 8% DV Calcium, 6% DV Iron

:)

Wednesday, January 4, 2012

Clean Eating Salsa Barbeque Chicken Tacos (Crockpot)

Makes 8 servings, about 2/3 cup each
My husband loves anything involving salsa and tortillas and I love anything involving minimal effort and not having to remember to defrost the chicken. That means this recipe is a win-win for our family :) This is a great dump-and-go recipe that makes a whole bunch of really tender, juicy shredded chicken with a very interesting barbeque-y flavor. We serve it as taco meat but you could use it as a sandwich topper, in a salad, on rice, whatever. Go crazy!


We eat ours as a taco salad in homemade tortilla bowls


Ingredients:
  • 6 chicken breast halves (about 1.5 lbs, frozen solid is just fine!)
  • 16 oz jar salsa
  • 6 oz can tomato paste
  • 2 tsp ground (dry) mustard
  • 1/4 cup molasses
  • 2 Tbsp worcestershire sauce
  • 3 Tbsp apple cider vinegar
  • 3 Tbsp honey
ONE: Dump everything into the crockpot and stir. Cover and cook on high for 4 hours or on low for 6-8 hours.


TWO: Remove the chicken from the sauce and shred it using two forks. Stir the shredded chicken back into the sauce and let it cook 30 minutes more with the lid off to thicken the sauce. 


Scoop servings out with a fork to let the extra liquid drip out. Freeze leftovers in 2/3 cup servings using the medium/large portions method to feed your freezer stash.

NUTRITION INFO:
Per 2/3 cup serving- 244 Calories (28 Calories from Fat), 3g Total Fat, 1g Saturated Fat, 72mg Cholesterol, 584mg Sodium, 24g Carbohydrates, 2g Dietary Fiber, 18g Sugars, 28g Protein, 10% DV Vitamin A, 6% DV Vitamin C, 3% DV Calcium, 11% DV Iron 

:)

Tuesday, January 3, 2012

Clean Eating Pumpkin Coconut Bars

Makes 16 servings, 1 bar each
I first got the idea for this recipe from my friend, Julie. (Hi, Julie!) Julie's 2-year-old daughter was one of my Survival Swim students this past summer and, as soon as I heard about some of the interesting and delicious things she was eating for dinner, I knew Julie and I would be good friends :) They came over a few weeks ago for a marathon healthy-cooking-and-freezing session and Julie brought one of these along for her daughter. She got the recipe HERE and I was immediately intrigued. With a few minor changes it was easy to make it into a Clean recipe. The main thing I did was significantly reduce the amount of sweetener used and substitute honey for the white and brown sugar. As the author of the original recipe says, they were quick and easy to make with minimal clean up. Always a plus in my book!


Ingredients:
  • 1/2 cup natural peanut butter
  • 1 cup pumpkin puree
  • 2 cups rolled oats
  • 1/2 cup honey
  • 1/3 cup unsweetened shredded coconut
  • 2 Tbsp cinnamon
  • 3/4 tsp ground ginger
  • 3/4 tsp ground nutmeg
  • 1/2 Tbsp coconut extract
  • 1/3 cup chocolate chips
ONE: Dump everything into a bowl and mix well. Line an 8x8 or 9x9 pan with foil and spray lightly with cooking spray.


TWO: Spread batter (it will be pretty moist) into a foil-lined and spayed 8 x 8 or 9 x 9 pan. Bake at 350F for 25-28 minutes or until toothpick inserted in center comes out clean.

THREE: Let the bars cool for a few minutes in the pan and then transfer them to a cooling rack. The bars may still look underdone, but that’s ok because they will continue to set up as they cool. Allow to cool very well before slicing.


Individually wrap bars and keep them in the fridge for a week or throw wrapped bars into a freezer bag and freeze for longterm storage.

NUTRITION INFO:


Per 1 bar serving- 169 Calories (65 Calories from Fat), 7g Fat, 3g Saturated Fat, 1mg Cholesterol, 6mg Sodium, 23g Total Carbohydrates, 3g Dietary Fiber, 12g Sugars, 5g Protein, 48% DV Vitamin A, 1% DV Vitamin C, 2% DV Calcium, 8% DV Iron

:)

Sunday, January 1, 2012

Clean Eating Magazine on Sale for $4.99/year! Valid through January 2nd ONLY!!


Discount Mags has a great New Year's Magazine Sale right now! My favorite of course was a 1-year subscription to Clean Eating Magazine for only $4.99. But hurry because the sale ends tomorrow, 1/2/12!! For the full details of the sale check out the post on I Heart Publix.


:)

Friday, December 16, 2011

Clean Eating Italian Wedding Soup

Makes 14 servings, 1 cup each (I think…)
I first made this soup when my superbly awesome and wonderful sister, Anthea, was visiting me over the summer. (Hi, Anthea!) We eat a LOT of soups in our house because it’s such a great vessel for throwing a ton of veggies into which my kids will happily eat because they are soft and too hard to pick out. Also, soups freeze exceptionally well which is always a plus in my book. If you search for Italian Wedding Soup you will find literally thousands of different recipes… so naturally I couldn’t follow any of them and had to make my own :)

I poured over the bazillion variations to get a general idea of what the main idea of the soup should be and then made some substitutions and adjustments. It made a HUGE pot… and I'm not totally sure how many servings it was because we ate it so fast I didn’t get a chance to count. All of the kids scarfed it down with little to no coercion, even my super picky nephew. And then we made it again and again and again.


How I “healthified” it:
Many of the recipes used ground beef or fattier types of ground pork for the meatballs. I stuck to ground turkey and added some chopped sundried tomatoes and some other seasonings to tasty them up.

Many of the recipe were basically just broth, eggs, and cheese with little to no veggies. I added carrots and celery to my broth because these tend to do really well in soups and lend a nice texture. Plus I bumped up the greens from a measly ½ or 1 cup to 5 cups and used kale for it’s power packed nutrition profile. It shrivels and gets all soft in the soup anyway so you don’t even really notice it’s in there. I like to get as much greens into my family as possible :)

Many of the recipes used orzo or some other type of pasta. None of my stores carry whole grain orzo and Anthea insisted that big pasta was just not right so we used quinoa instead. Quinoa is great in soups because it softens but doesn’t lose it’s texture and it’s a complete protein all in itself. Plus it gets those curly ribbons when it’s cooked so it’s just fun.

I substituted some of the broth for water because, when we made it with all broth, it was too salty. Plus, I knew for a fact that we were going to sprinkle a little extra parmesan cheese on top before serving which would make it even more salty.

Finally, a LOT of the recipes had an egg or two and a bunch of parmesan cheese stirred into the soup. I felt like the soup was tasty enough and a nice texture without this addition and I like to sprinkle my little bit of parmesan on top at serving so I skipped it. I’m sure this means that this is not an “official” Italian Wedding Soup but I’m cool with that.

The results: Only 143 Calories but it packs a whopping 12g of protein, 2g of dietary fiber, 118% of your daily value of Vitamin A and 51% of your daily value of Vitamin C. In one little bowl of soup… that my kids will happily eat… and tastes delicious while being filling. Yay :)

Ingredients:
Soup –
  • 7 cups low sodium chicken broth
  • 3 cups water
  • 4 tsp minced garlic
  • ½ tsp pepper
  • 1 yellow onion, diced
  • 3 medium carrots, peeled and sliced into thin rounds
  • 2 stalks of celery, sliced
  • 1 cup uncooked quinoa
  • 5 cups of kale (or other greens)
  • 1 Tbsp dried fennel (Anthea did NOT like this addition and she felt it was a weird taste [not that it stopped her from inhaling two full bowls mind you] so the next time we made it we didn’t put it in. I thought the second batch was missing something and that the fennel really added a nice flavor so, when she’s not here, I always add it. I say, if you have fennel on hand, sniff it and if you think it would be a taste that you’d like, throw it in there. It kind of has a licorice flavor but it worked for me.)
Meatballs-
  • 1 lb ground turkey
  • 1/3 cup finely diced onion
  • 3 big sundried tomatoes, finely chopped
  • 1 tsp Italian seasoning
  • ¼ cup whole wheat bread crumbs (I use unfrosted miniwheats ground in the blender)
  • ½ cup parmesan cheese
ONE: Add a little drizzle of olive oil to a big pot and toss in the onion, garlic, carrots, celery, fennel (if you’re using it) and quinoa. Cook over medium high for about 5 minutes, stirring regularly, until the onions just start to soften and the quinoa is slightly toasted.

TWO: Add the broth, water, and pepper and bring to a gentle boil. While the soup mixture is heating up, begin cutting the kale into small pieces and adding it into the liquid. I hold a bunch of kale in one hand and use my kitchen scissors to snip the leaves into the pot. Discard any stems or tough pieces.


THREE: Once the soup is boiling, reduce to a simmer. In a medium bowl combine all of the meatball ingredients and mix well. (I use my hands which is totally gross-feeling but does the best mixing job)

FOUR: Using your hands, roll the meatball mixture into mini meatballs and drop them into the pot. (If the mixture seems too dry and the meatballs won’t stick together, add a splash of egg whites.) After about every 10 or so meatballs, use a spoon to push them down into the soup. You might need to add a little extra water or broth if there’s not enough liquid to submerge them all.


FIVE: Once the last meatball is in the pot, increase the heat to medium and let the mixture simmer for 10 minutes or until the meatballs are cooked through, the veggies are tender, and the quinoa has little curls. Serve garnished with a bit of extra parmesan cheese if desired.


Freeze leftovers using the medium/large portions method to feed your freezer stash. Defrost in the microwave or on the stovetop.

Nutrition info:
Per 1-cup serving143 Calories (40 Calories from Fat), 4g Fat, 1g Saturated Fat, 26mg Cholesterol, 160mg Sodium, 14g Carbohydrates, 2g Dietary Fiber, 1.5g Sugar, 12g Protein, 118% DV Vitamin A, 51% DV Vitamin C, 10% DV Calcium, 10% DV Iron.
:)

Thursday, September 29, 2011

Clean Eating Unstuffed Peppers Casserole

Do you want to eat something AMAZINGLY delicious for dinner tonight? Look no further!


Those of you who know me know that I almost never follow a recipe exactly. I can't help but tweak or modify as I go. But my very good friend, Mandy, has made this casserole for me a few times and when I make it for myself, I follow the recipe word for word :) It seems so simple but it is to die for. 

The thing I like best is that I can throw it together so quickly using my freezer stash. Two of the main ingredients are cooked brown rice and chopped bell peppers. I always have cooked brown rice at the ready in my freezer and when bell peppers are on sale I buy a bunch, chop them all up, and throw them in a freezer bag to use  in recipes just like this one.

This recipe is Clean as long as you read the label really carefully on the pasta sauce and choose one without anything undesirable added. The only modification I might make would be to decrease the amount of cheese from 2 cups to one. My family loves cheese and we aren't trying to eat a reduced fat or calorie diet so I use the full amount. However, if you are trying to lose weight or lower your cholesterol or something, there will still be plenty of flavor with less cheese. 

For the full recipe, check out the post on my friend, Mandy's, blog HERE! Thanks, Mandy!!!!!!!:)

Monday, September 26, 2011

Clean Eating Whole Wheat Banana Pecan Waffles

Makes 12-15 waffles
We LOVE waffles in our house. And I especially love them when all I need to do is pull them out of the freezer and pop them into the toaster. I'll make a big batch every few weeks and we'll eat them fresh for breakfast and then freeze the leftovers. Then every couple of days I can give my boys a nice hot breakfast without actually having to cook :) These are especially great for when we are rushing to get somewhere in the morning because they can be eaten mess-free in the car. Always a plus in my book!


Ingredients:
  • 1 1/2 cups whole wheat flour (I use King Arthur's White Whole Wheat)
  • 1 Tbsp baking powder
  • 1/2 tsp salt
  • 2 Tbsp wheat germ/ground flax seeds
  • 1/2 cup chopped pecans
  • 3 egg whites
  • 1 1/4 cups skim milk
  • 3/4 tsp almond extract 
  • 2 Tbsp olive oil
  • 2-3 very ripe bananas, mashed

ONE: Preheat the waffle iron. In a large mixing bowl, combine flour, baking powder, salt, wheat germ/ground flax seeds, and pecans.

TWO: In a separate bowl, whisk together the egg whites, milk, almond extract, oil, and mashed bananas until well blended.

THREE: Pour the egg mixture into the flour mixture and stir until just blended.

FOUR: For each waffle, lightly mist the waffle iron with cooking spray and pour 1/4 cup of batter onto each grid, spreading it out to mostly cover the grids. Close the iron and cook about 4 minutes or until lightly browned. (You may need to do more or less batter depending on your brand of waffle iron. You want to use just enough that the grids are covered with a thin layer. If you do too much, it will spill over and stick to the sides and pull the waffle apart into a big mess when you open it. Not that I speak from experience or anything....)

Freeze leftovers using the tray freeze method to feed your freezer stash. We reheat ours in the toaster oven but you could also use a toaster, microwave, or regular oven.

NUTRITION INFO: 

Per waffle - 120 Calories (45 Calories from Fat), 5g Fat, 0.5g Saturated Fat, 0mg Cholesterol, 99mg Sodium, 16g Total Carbohydrates, 1.5g Dietary Fiber, 4g Sugars, 3.4g Protein, 1% DV Vitamin A, 3% DV Vitamin C, 8% DV Calcium, 5% DV Iron
:)

Monday, July 25, 2011

Clean Eating Almond Butter Chocolate Chip Cookies (Flourless Cookies)

Makes 48 small cookies or 36 mid-sized ones
I have no idea why I haven't posted this sooner because we literally make a batch every week (actually right now Danielle makes us a batch every week, but you know what I mean). This is a Clean Eating recipe all the way back from the March/April 2010 issue. I saw it when it was first published and was hesitant to make them because it used a whole cup of Almond Butter. Let's be honest, that stuff is expensive! I basically ration it out in our house. 


My very good friend, Martha (Hi Martha!) thought the same thing until her mom, Danette (Hi Danette!!) made them. Apparently after trying them, Martha's dad said that there would never be a need to make any other cookie they were that good. Since we started making them I literally have not made any other kind of cookie unless I was making it for a specific reason (like using up leftover veggies). We've made them using just almond butter and using half almond butter and half peanut butter and they are scrumptious both ways. We ALWAYS make a double batch so I'm not even going to bother posting the single recipe. 

Ingredients:

  • 2 cups unsalted almond butter, stirred well (or any other combination of nut butters equalling 2 cups)
  • 1 1/4 cups Sucanat
  • 2 large eggs
  • 1 tsp baking soda
  • 1/2 tsp sea salt
  • 1 cup dark chocolate chips
ONE: Preheat oven to 350. Stir everything together adding the chocolate chips in last.

TWO: Drop dough by rounded tablespoonfuls onto cookie sheets and bake for 10-12 minutes until lightly browned. Let them cool on the baking sheet for 5 minutes and then transfer them to a wire rack.

Once they're completely cool, we store ours in a cookie tin. You could definitely freeze them using the tray freeze method... it might help you eat them a little slower, lol!

NUTRITION INFO:

Per small cookie made with only Almond Butter - 110 Calories, 8g Fat, 1.5g Saturated Fat, 10g Carbs, 1g Fiber, 3g Sugars, 2g Protein, 55mg Sodium, 10mg Cholesterol
:)

Monday, July 18, 2011

Clean Eating Black Bean Burgers

Makes 10 Burgers
This recipe came about because we had "nothing" in the house and a pack of hungry kids. By nothing I mean I didn't have my standard go-to protein sources of chicken breast and ground turkey. Since we're not vegetarian, we generally have some type of meat with dinner. But when I don't have any in the house it makes me realize how single-minded my cooking is in some ways. Combining whole grains and beans creates a complete protein and we have about a million cans of black beans in our house from a totally awesome sale a few months back so we decided to give black bean burgers a try. They were a HUGE success. The toddlers devoured them including my super picky nephew and Matt, Anthea, and I all got to eat ours with two hands without having to force feed anybody. That's a big success in my book :)

Ingredients:

  • 3 medium carrots, grated
  • Half a medium onion, finely chopped (I grated mine since I was already grating the carrots)
  • 2 tsp cumin
  • 2 tsp chili powder
  • 2 tsp garlic powder
  • 2 tsp onion powder
  • 2 cans black beans, drained and rinsed
  • 1/2 cup kale
  • 1/2 cup packed cilantro leaves
  • 2 Tbsp Dijon mustard
  • 3/4 cup whole wheat bread crumbs (I used ground unfrosted mini wheats)
  • 1 tsp salt
ONE: Spray a skillet with cooking spray and place over medium heat. Add the onions and carrots and saute for 2 minutes. Stir in the cumin, chili, garlic, and onion powder and continue to cook until the veggies are soft. Remove from heat and set aside in a large bowl.

TWO: Place drained beans, kale, and cilantro in a food processor and pulse several times until beans are mostly mashed but a few chunks still remain.

THREE: Add the beans, mustard, bread crumbs, and salt to the bowl of veggies and stir to combine. Scoop out scant 1/3 cup portions and form into patties.

FOUR: Heat the skillet you cooked the veggies in over medium heat and spray generously with cooking spray. Place the patties in the skillet a few at a time and cook 4 minutes a side until lightly browned and heated through.

TO FREEZE: Before cooking, form the patties and place them in a single layer on a cookie sheet lined with wax paper. Place in the freezer for about 20 minutes to flash freeze the outsides and then place them all together in a freezer bag. Defrost overnight and cook according to the directions above.

After cooking, follow the same directions as above and reheat in the microwave.

NUTRITION INFO:


Per Serving (1 burger) - 124 Calories (7 Calories from Fat), 1g Total Fat, 0mg Cholesterol, 463mg Sodium, 22g Carbohydrates, 6g Dietary Fiber, 4g Sugar, 6g Protein, 75% DV Vitamin A, 13% DV Vitamin C, 5% DV Calcium, 36% DV Iron

:)